


Jira is a popular tool for issue tracking and project management. It has helped over 65,000 companies track and measure work at every level and build workflows that deliver reliable results. Jira is also a great way to start implementing agile practices in your company. While originally designed with a focus on software development, Jira is now used across industries to meet a huge variety of use cases, including asset management, project portfolio management (PPM), and employee onboarding.
But Jira’s powerful features come at the cost of complexity. Getting the most out of Jira requires both customizing it to meet your unique business requirements and getting all your team members aligned on how to use it.
With the help of this comprehensive, easy-to-follow guide, you’ll be up and running in Jira in no time. It covers every aspect of working in Jira, from issues and subtasks to integrations and plugins. Find the information you need quickly by using the menu below:
- Before You Start: Purchasing a Jira License
- Getting Started with Jira Step-by-Step
- Going Beyond The Basics
Before You Start: Purchasing a Jira License
Before you can start using Jira, you need to evaluate its three versions — Software, Service Desk, and Core — and its hosting options — Server, Cloud, and Data Center — to determine how you can best meet your business needs while staying within budget.
Each version of Jira is designed for distinct use cases:
- Jira Software comes with the most robust project management capabilities, including support for agile project management.
- Jira Service Management is intended for addressing customer issues.
- Jira Core lacks the agile project management functionality of Jira Software, but it can still meet most project management needs.
Carefully consider the available hosting options for Jira as well. Jira Cloud provides organizations with the convenience of a Jira instance hosted by Atlassian. It is most appropriate for companies that don’t have the resources to host a Jira deployment themselves and lack any unusual scaling or performance requirements. Both Jira Server and Data Center require organizations to host a Jira instance using a third party cloud provider or their own infrastructure and provide additional scaling, management, and security options. Organizations on Jira Cloud can migrate to Jira Server or Data Center if they need the additional flexibility and power later on.
The cost for any Jira deployment is based on the number of users in your organization. That number determines the monthly, annual, or one-time pricing tier you fall into.
If you’re interested in learning more, take a look at our complete guide to purchasing a Jira license.

Getting Started with Jira Step by Step
Accomplishing anything in Jira requires becoming familiar with its fundamental concepts and features. This guide moves through the process of using Jira step by step, explaining each concept and how to employ it in turn.
Projects
All work in Jira is grouped into projects that can consist of any number of discrete tasks — called “issues” in Jira. Projects can consist of anything from a few issues for following up on sales leads to hundreds of issues related to developing a new product.
Creating a project in Jira takes only a few minutes:
- First choose Projects from any Jira screen, then select View all projects.
- Click on Create project and then choose Classic project or Next-gen. Classic projects use standard configurations that can be duplicated across projects, while next-gen projects offer the flexibility of individual configuration at the cost of less customizability.
- Give your project a name, and select a template like Scrum or Kanban — more on these in the following section covering boards in Jira.
- Select Create, and you’re finished.
If you haven’t yet added your team members to Jira, you can do so by email in both Jira Cloud and Server/Data Center — but don’t forget that the cost of Jira is dependent on the number of users. While you’re adding team members, consider what permissions you want each to have when working in your new project. Should everyone be able to create issues? What about editing workflows? To adjust project permission schemes, click on the gear-like settings icon, select Issues, and then choose Permission Schemes.
For more information on working with projects, take a look at our complete guide to project management in Jira.
Boards
After creating a project, you need to decide how you want to visualize all the work you’ll manage in it by using boards. A board displays issues and allows easy navigation among them. Boards are typically associated with issues from a specific project, but they can also display issues according to a variety of other useful criteria, such as issues that are assigned to a specific user.
Kanban vs. Scrum
There is only one type of board available in Jira Core, but Jira Software users can choose from two primary types of boards: Scrum and Kanban. Scrum is centered around sprints — relatively brief intervals for completing a set work goal — while Kanban focuses on using its titular Kanban boards to manage work and improve efficiency.
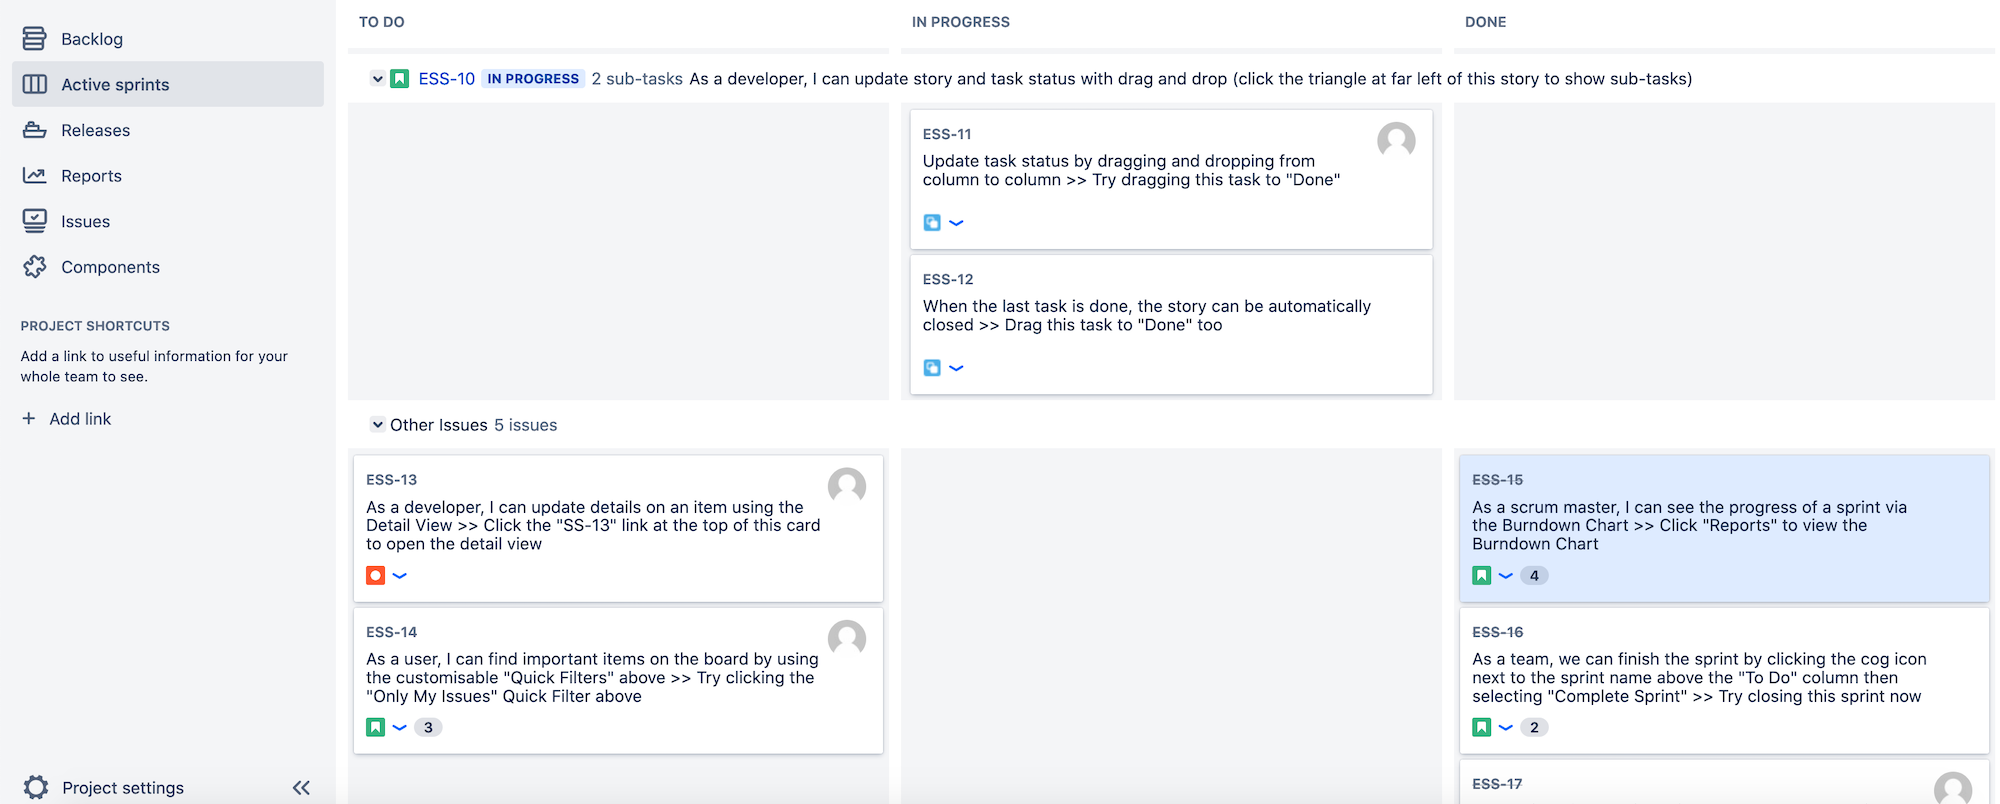
Scrum boards in Jira include a backlog that displays issues that currently aren’t being worked on…
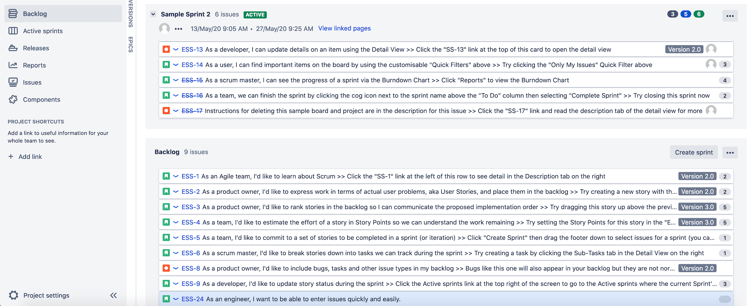
...and a view that shows issues that are part of ongoing sprints.
Kanban boards are designed to clearly show issues at various stages of progress so tasks are completed more quickly, everyone can see where a project stands, and you can better manage workloads.
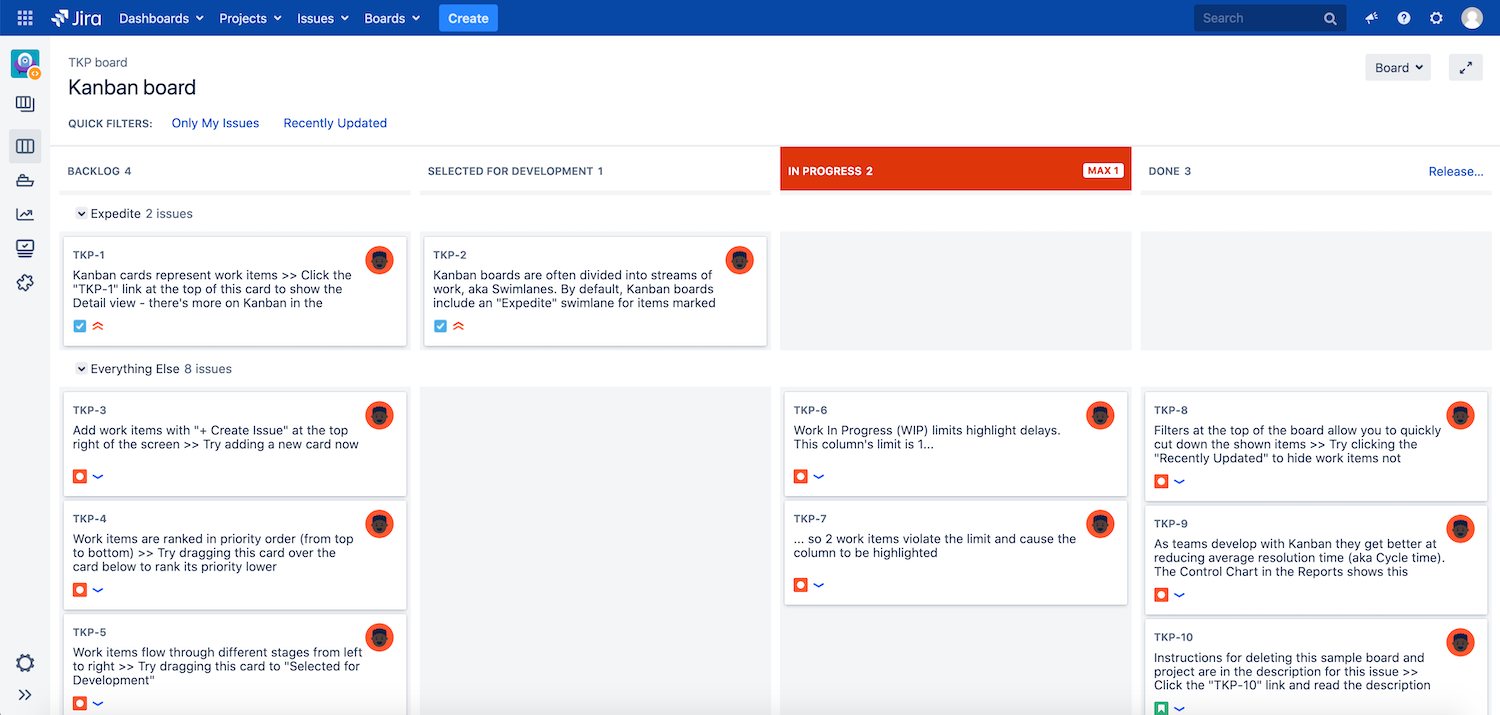
There are benefits to each approach —Kanban offers greater transparency and flexibility, while Scrum provides more structure and definition — so carefully consider which fits your organization best before proceeding.
Using boards
To create either a Scrum or Kanban board in Jira Software, click the search field, select View all boards, then choose Create board. You can then decide which type of board to create and choose what project to display using the board — or create a new project entirely. After creating your board, you can customize it by using Jira Query Language (JQL) to filter the issues it displays according to almost any parameter you can think of.
Now that you’ve decided how you want to structure and view work in Jira, it’s time to define the processes users will follow to complete tasks.
Workflows
Workflows determine the processes that team members will follow when completing issues in Jira. Jira’s workflow capabilities are among its most powerful, and customizing workflows to guide your team members and standardize your important processes is highly recommended. All workflows are comprised of the following parts:
- Statuses: Think of statuses as the steps a workflow moves through — for instance, "Planning," "Developing,” and "Testing." A Jira issue can only have one status at a time.
- Transitions: Transitions connect statuses and determine how the workflow moves from one to another. They allow for creating nonlinear workflows and controlling under what circumstances a workflow can move forward.
- Assignees: The assignee is the Jira user or group responsible for an issue when the workflow is at a specific status.
- Resolutions: Resolutions represent the final result of a workflow, such as “Complete” or “Won’t Do.”
To create a new workflow in Jira, follow these steps:
- Click on the gear-like settings icon, then Issues, then Workflows.
- Choose Add workflow, enter some basic information, and select Add.
- Within the workflow editor, define the steps of the workflow using Add status, and connect the steps using Add transition. You can define as statuses and transitions as you wish, but it’s best to keep your workflow as lean as possible to avoid confusion and maximize efficiency.
- Finally, to add resolutions, navigate back to the Issues menu and click on Resolutions.

Workflow Schemes
Workflows are associated with issues and projects through what Jira calls workflow schemes. You can create a workflow scheme from the Issues menu by selecting Workflow Schemes and clicking on Add Workflow Scheme. You can then choose the specific workflows and types of issues you want to include in the scheme. To associate your new workflow scheme with one or more projects, select Projects, click View all projects, choose a project, click Project settings, and then choose Workflows and Switch Scheme.
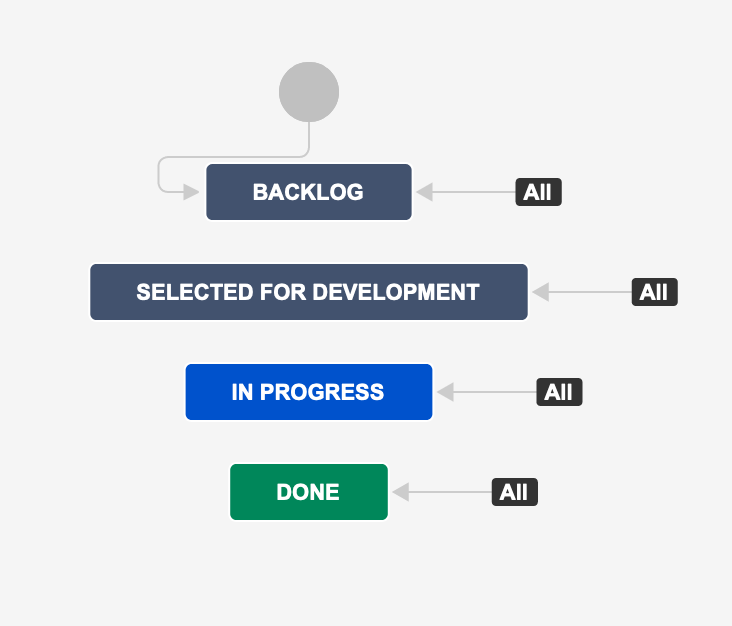
Configuring Workflows
Administrators can further customize workflows by altering four different elements, each with a distinct purpose: statuses, transitions, assignees, and resolutions. This handy infographic explains how you can use each:
Discover more about creating workflows for all your common tasks in Contegix’s guide to using workflows in Jira.
Issues
Issues are the units of work that are make up projects. Each issue represents a discrete task that must be completed, although the scope of that task can vary widely, and each contains specific information that helps team members collaborate and stay on track. You can define issue types to represent almost any kind of work imaginable, although all versions of Jira come with some default types that cover many use cases. As discussed above, every issue is associated with a project and workflow.
To create a new issue, select the Create button, which may either contain that word or a plus symbol. Then fill out all information that may be required — for instance, the issue’s assignee or priority level — and determine whether any optional information should be added. Once you’ve finished, click Create.
Issue Types
If you need to create a new issue type for the project, choose Issue type schemes from the Issues menu, but be cautious that you’re not creating an issue type that will be rarely used or could be better defined using a workflow, so you avoid causing inefficiencies or reporting inaccuracies. You can associate your new issue type with an existing project by selecting Associate for the relevant issue type scheme in the Issue type schemes menu.
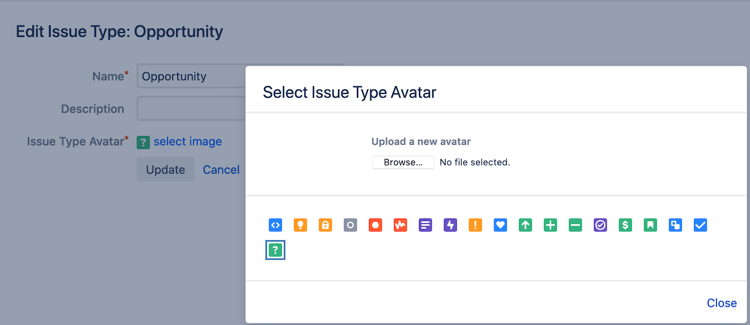
You can also change an issue’s task by selecting the issue type icon to the left of the issue key when viewing the issue:
Fields
You can customize the fields for an issue type to change the information displayed on the corresponding issue screens. Be careful when adding new fields or deleting existing ones, as you can easily omit important information or create confusion by including unnecessary data. To start working with fields, select Fields from the Issues menu and then click Field configurations.
Security
You can control who has the ability to view issues in Jira using issue security schemes. To create one, access the Issues menu, choose ISSUE ATTRIBUTES, and select Issue security schemes. Controlling the visibility of issues in Jira allows you to protect sensitive information and even erect screens between teams working for different clients in the same industry.
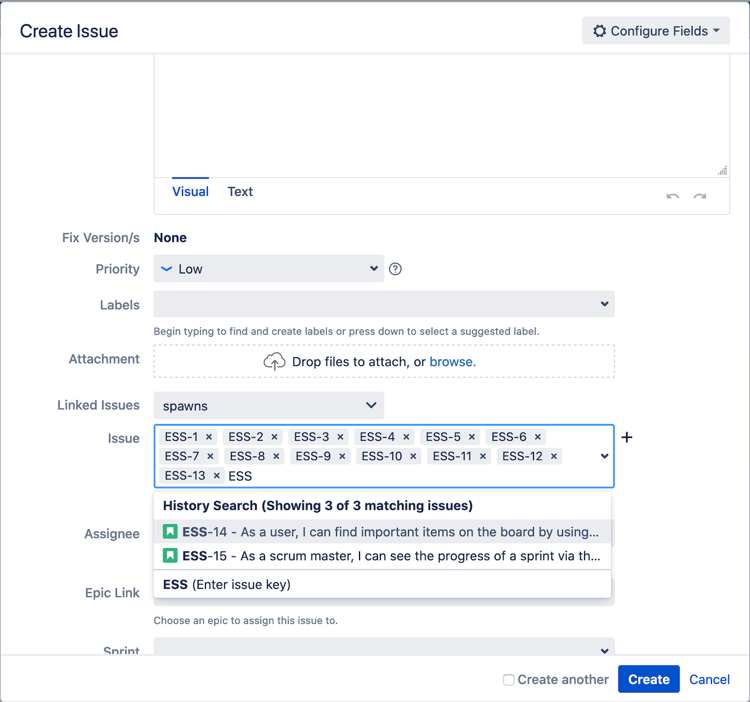
Linking
One of the best ways to organize issues is by establishing relationships between them using links. Linking lets users define how issues relate to each other by establishing connections such as “builds,” “is cloned by,” or “has to be done after.” Links can be created from any issue screen by clicking Link issue.
Cloning
Copying an issue within the same project is called “cloning” in Jira. All information — excepting data unique to the copied issue, like its status or the time logged against it — is duplicated to the cloned issue. This makes cloning a fast way to populate a project with issues of the same type without having to repeatedly enter the same information during issue creation.
Cloning an issue is as simple as clicking on the ellipsis icon on an issue screen, choosing Clone, and clicking Create.
Subtasks
Subtasks can be used to define specific pieces of work within an issue that you want to track individually or that need to be assigned to someone other than the assignee for the primary issue. To make a subtask, select Create subtask from an issue screen. If you later need to turn a subtask into a separate issue, click on the icon to the left of the subtask’s issue key.

Reports, Dashboards, and JQL
Jira provides native reporting features that enable users to measure KPIs such as time to completion for select issues. You can create reports by navigating to a board and then selecting Reports. Additional reporting capabilities are available through certain plugins on the Atlassian Marketplace, such as Portfolio, which provides reporting based on roadmapping features that aren’t available natively in Jira.
To learn more about the additional visualization and reporting options available in Portfolio, check out our guide on using Portfolio for Jira
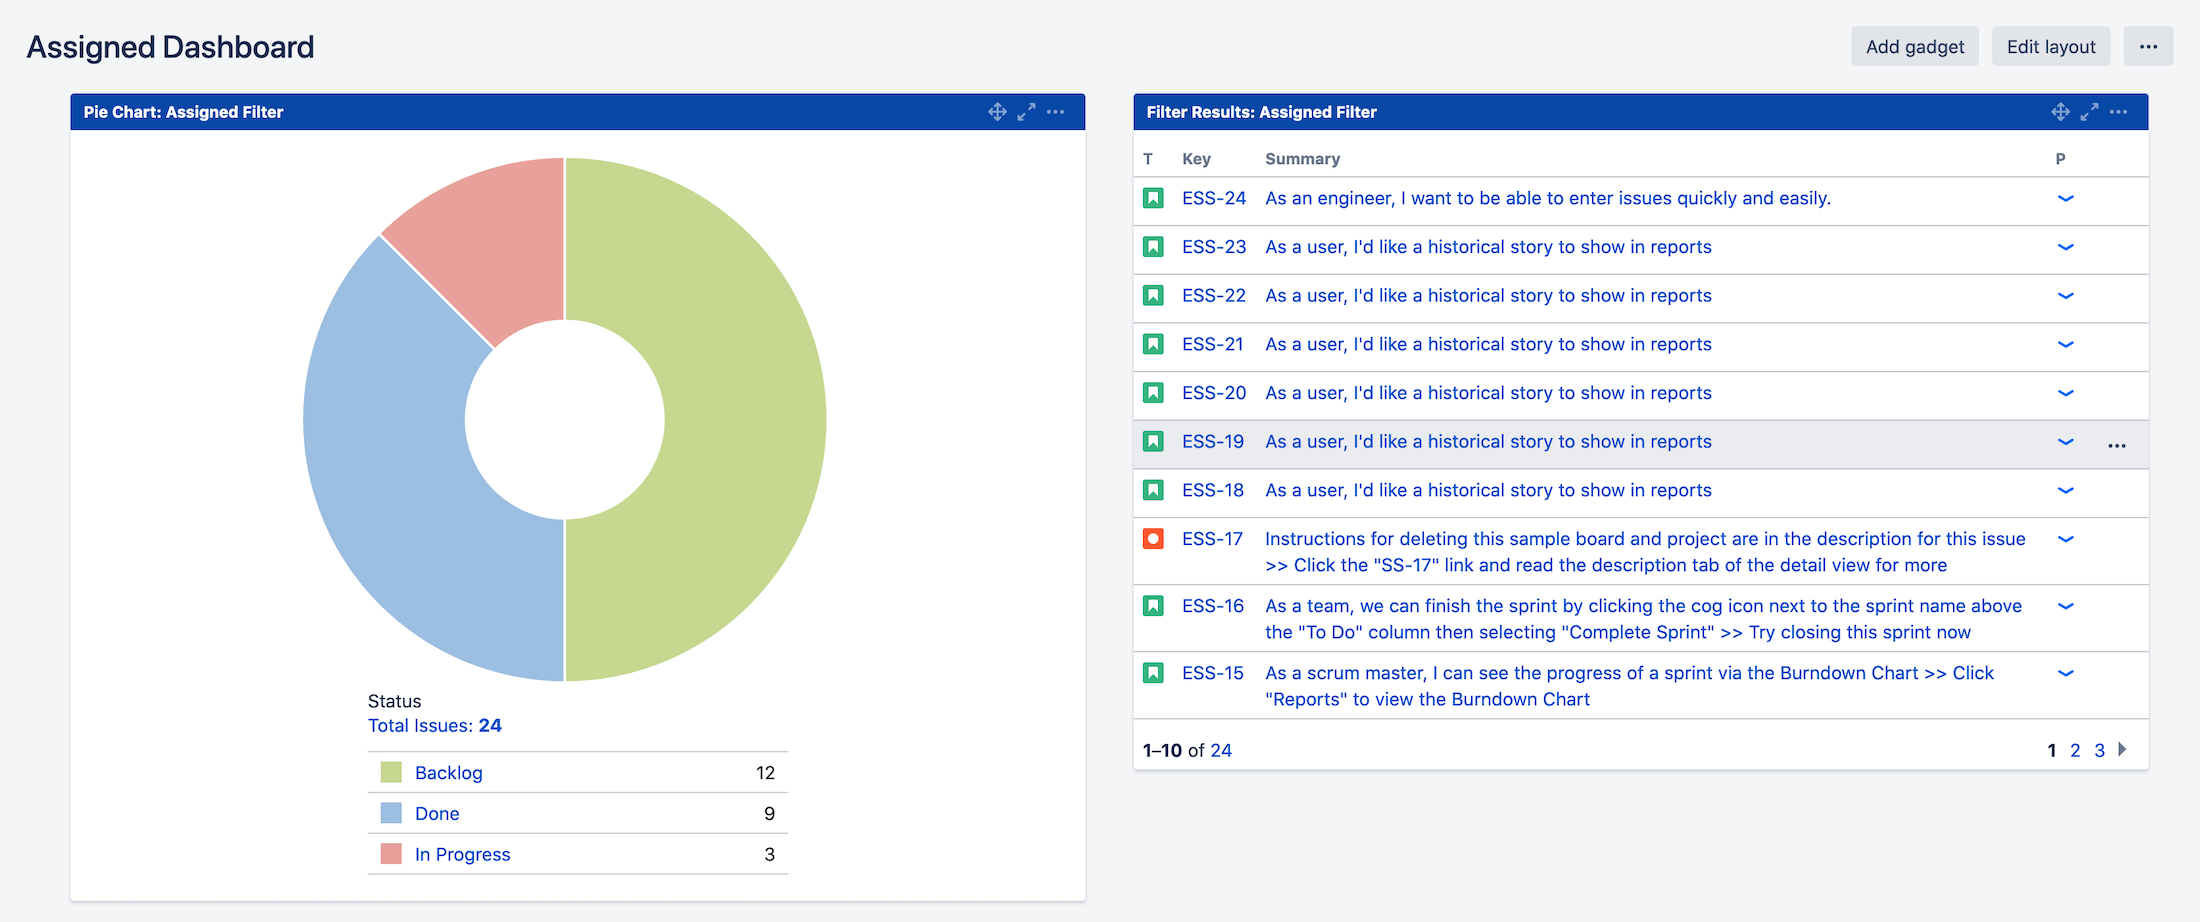
You can also use dashboards for reporting. Dashboards are screens in Jira that you can customize to display certain information using gadgets. Gadgets let you display data related to projects and issues — like issues with a specific label or how quickly issues are being resolved — in a variety of formats, including as a calendar or a heat map. Here are some quick tips for getting started with dashboards:
- To create a new dashboard, select Dashboards from any Jira screen, then click Create dashboard.
- To edit an existing dashboard to change its name, description, or who it is shared with, click View all dashboards from the Dashboards menu. Then click on the ••• symbol in the row for your dashboard and select Edit and share dashboard.
- You can add new gadgets to an existing dashboard by clicking Add gadget from any dashboard screen.
- You can also change the layout of an existing dashboard by selecting the Edit layout button on the dashboard screen.
Finally, those familiar with JQL can use it to enhance Jira’s reporting capabilities. As noted above, JQL is the language used to create advanced queries when searching through issues in Jira. JQL queries can be used to find data that would otherwise be difficult to identify — for examples, all issues with the name of a certain product or competitor in any information field. You can save JQL statements as filters which can then be shared with others or even displayed in a dashboard using the Filter Results gadget.
To save a JQL statement, enter your query and then select Save as on the results page. You can use existing filters by selecting Filters on any Jira screen and then selecting View all filters.
Integrations
Jira features integrations with many useful applications both within and outside of the Atlassian Ecosystem. From Bitbucket and Github to Slack and Salesforce, exploring how you can integrate Jira with other tools you use daily can lead to discovering additional efficiencies and enhancing the capabilities of each platform. Integrations with third-party tools are usually facilitated through plugins.
One of the most valuable platforms you can integrate with Jira is Confluence, a content management tool that allows users to create knowledge bases and organize written information. Confluence’s content management capabilities complement Jira’s project management features, so users can seamlessly move between issues and related documents.
For more information on using Jira and Confluence together, check out our guide to integrating them.
Plugins
There are over 3000 plugins for Jira — also referred to as “apps” or “add-ons” — available on the Atlassian Marketplace. Plugins are additional pieces of software that provide critical features that aren’t offered natively by Jira, including:
- Enhancing workflows through greater customization and automation
- Security and single sign-on for ease of use and keeping your Jira deployment safe
- Time tracking so your team members can accurately track their hours and you can discover new ways to improve efficiency
- Advanced scripting for altering how Jira behaves and appears
Jira administrators can install most plugins using Jira’s built-in Universal Plugin Manager (UPM). To do so, click the gear-like settings icon and select either Manage Apps or Add-ons. You can then install most plugins with a single click using the Install button.
Need more information on what plugins are available and how to use them? Take a look at our guide to Jira plugins.
Going Beyond The Basics
You now have all the information you need to start realizing the benefits of Jira in your organization. But even after following the steps above, you may find yourself struggling to adapt Jira to your needs and wondering where to go next. Or you might be daunted by the prospect of handling an advanced task like customizing workflows or migrating between Jira Cloud, Server, and Data Center.
Contegix is a Platinum Atlassian Solution Partner whose team of Jira experts can help your organization identify the best ways to align Jira with your business objectives. Contegix can handle all your other Jira needs as well, from hosting to troubleshooting, so your team can focus on completing tasks. Start making Jira work for you by contacting us today.