


Workflows in Jira allow teams to define the processes required to meet their business goals. By defining and deploying workflows in Jira, you can establish standardized processes for all the projects teams manage. From handling customer service tickets to onboarding a new team member, teams use workflows in Jira for almost any process imaginable. Workflows keep everyone aligned and on schedule, and they’re one of Jira’s most powerful features.
Jira provides several default workflows, which are useful as a starting point for defining processes required to complete basic tasks. In order to get the most out of workflows, though, teams must customize these default workflows or create new workflows from scratch to meet their unique business needs. However, customizing workflows is a complex affair, and it can easily result in workflows that don’t function or fail to take advantage of all the efficiencies Jira has to offer.
This is a comprehensive guide to understanding and using Jira workflows. It discusses the major components of workflows, how to create them, and how to craft workflows that fit your organization.
Use the menu below for easy navigation:
- Components of a Jira Workflow
- Creating a Workflow in Jira
- Active vs. Inactive Workflows
- How to Get the Most Out of Workflows
- Customizing Transitions
- Using Workflow Properties
Components of a Jira Workflow
There are several distinct components of workflows in Jira. Each component serves a specific purpose in defining a workflow and its steps. The four main components are statuses, transitions, assignees, and resolutions. Let’s take a look at each in turn.
Statuses
A workflow consists of a variety of statuses, which represent the stages the workflow can pass through. For example, a workflow might include the statuses "Not Yet Started," "Planning," "In Progress,” and "Complete."

When creating or customizing workflows, keep in mind that a Jira issue can only have one status at a time — an issue cannot be both “On Deck” and “In Progress,” for example.
You can define a status and add it to a workflow by following these steps:
- Start by clicking the Jira icon, which looks like
 ,
,  ,
,  , or
, or  .
. - Select Jira Settings, then Issues, then Statuses.
- Click the Add status button.
Please note that the step-by-step instructions provided throughout this article are generally applicable to Jira Cloud only. If you have Jira Server, please refer to the relevant Atlassian documentation.
Users can create as many statuses in a workflow as they wish and label them freely based on what makes sense for their team. Statuses can also be color-coded to reflect different categories.
Transitions
Transitions are a representation of how a given stage of a workflow starts or ends — and, by extension, how a workflow moves from one status to another. For example, a transition could be labeled as “Start Planning" or "Start Building." As with statuses, transitions can be labeled and color-coded freely.
You can add a transition to a workflow by navigating to Workflows in the Issues menu, selecting Edit, and then clicking the Add Transition button in the Text tab.
Transitions can be used to create nonlinear workflows. For instance, a workflow with the status “In Progress” might allow the user to either move an issue back to the “Planning” stage through a “Reject” transition, or ahead to “Seeking Client Feedback” through an “Approve” transition.
Assignees
The assignee component of a workflow defines which Jira users or groups are responsible for an issue during given stages of a workflow. An assignee could be responsible for the issue across to every status of the workflow, or the assignee might change once or several times during the process.
Resolutions
Resolutions contain information about why a transition led to a particular outcome. For example, possible resolutions for a workflow that describes the process for writing an article might include “Article Posted,” “Won’t Do At This Time,” or “Rejected by Client.”
As noted earlier, you can create resolutions by selecting the Resolutions button in the Issues menu.
Be sure not to confuse resolutions with statuses or transitions. A status indicates where an issue is in the workflow, whereas a resolution indicates why the issue is no longer in the workflow. Similarly, a transition indicates how an issue got where it is — “Post Article” — rather than where it is now — “Article Complete.”
As with statuses and transitions, resolutions can be defined with whichever values the user wishes. However, it's important to note that Jira considers an issue closed regardless of what the resolution text contains. For that reason, you should avoid defining a resolution with text such as "Incomplete." A resolution with this definition is likely intended to represent a process that is still ongoing, but Jira would not recognize it as such. A better solution would be to use a transition to send the issue back to an earlier status, such as “In Progress.”

Creating a Workflow in Jira
Creating a new workflow in Jira is relatively straightforward:
- Start by clicking the Jira icon — , , , or .
- Select Jira Settings, then Issues, then Workflows.
- Click the Add Workflow button.
- Use the Add status and Add transition buttons to define statuses and transitions and add them to your workflow. You can define as many of these components as you wish.
- To add resolutions to the workflow, go back to the Issues menu and select the Resolutions button.
After you finish creating a workflow, you’ll have a useful diagram that will look something like this:
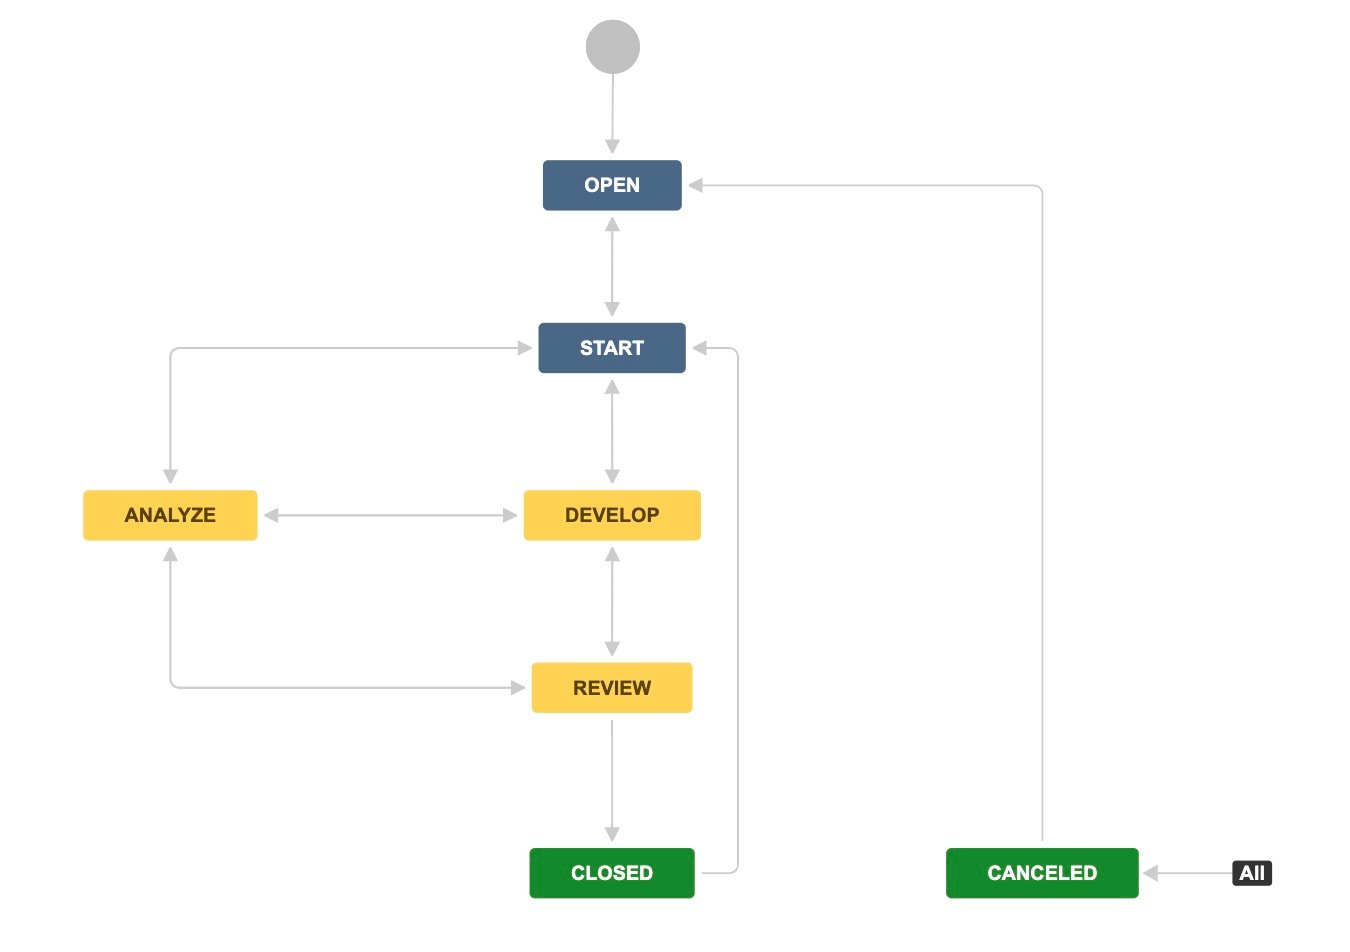
Only Jira administrators have full control over workflows in Jira. Project administrators have some limited ability to edit workflows when the “Extended Project Administration” permission is granted in the project’s permission scheme. This permission is enabled by default, allowing project administrators to edit workflows associated with the project, customize transitions, and add or delete existing statuses.
Importing a Workflow
If none of the default workflow schemes included in Jira fit your needs, you may wish to import a workflow from the Jira Marketplace. Jira allows users to upload their workflows to the Marketplace in order to share them with others. In many cases, you will be able to find a Marketplace workflow that provides a good template for building your own custom workflow.
To import a workflow from the Marketplace, first open the Issues menu in Jira Settings. Next, select Import from Marketplace. Here, you can browse workflows uploaded by Jira community members and select the one you want to import. At this point, Jira will allow you to indicate whether you want to import the entire workflow or select certain parts of it. When you have finished making this selection, click the Import button to import the workflow into your Jira installation.
Using Workflow Schemes
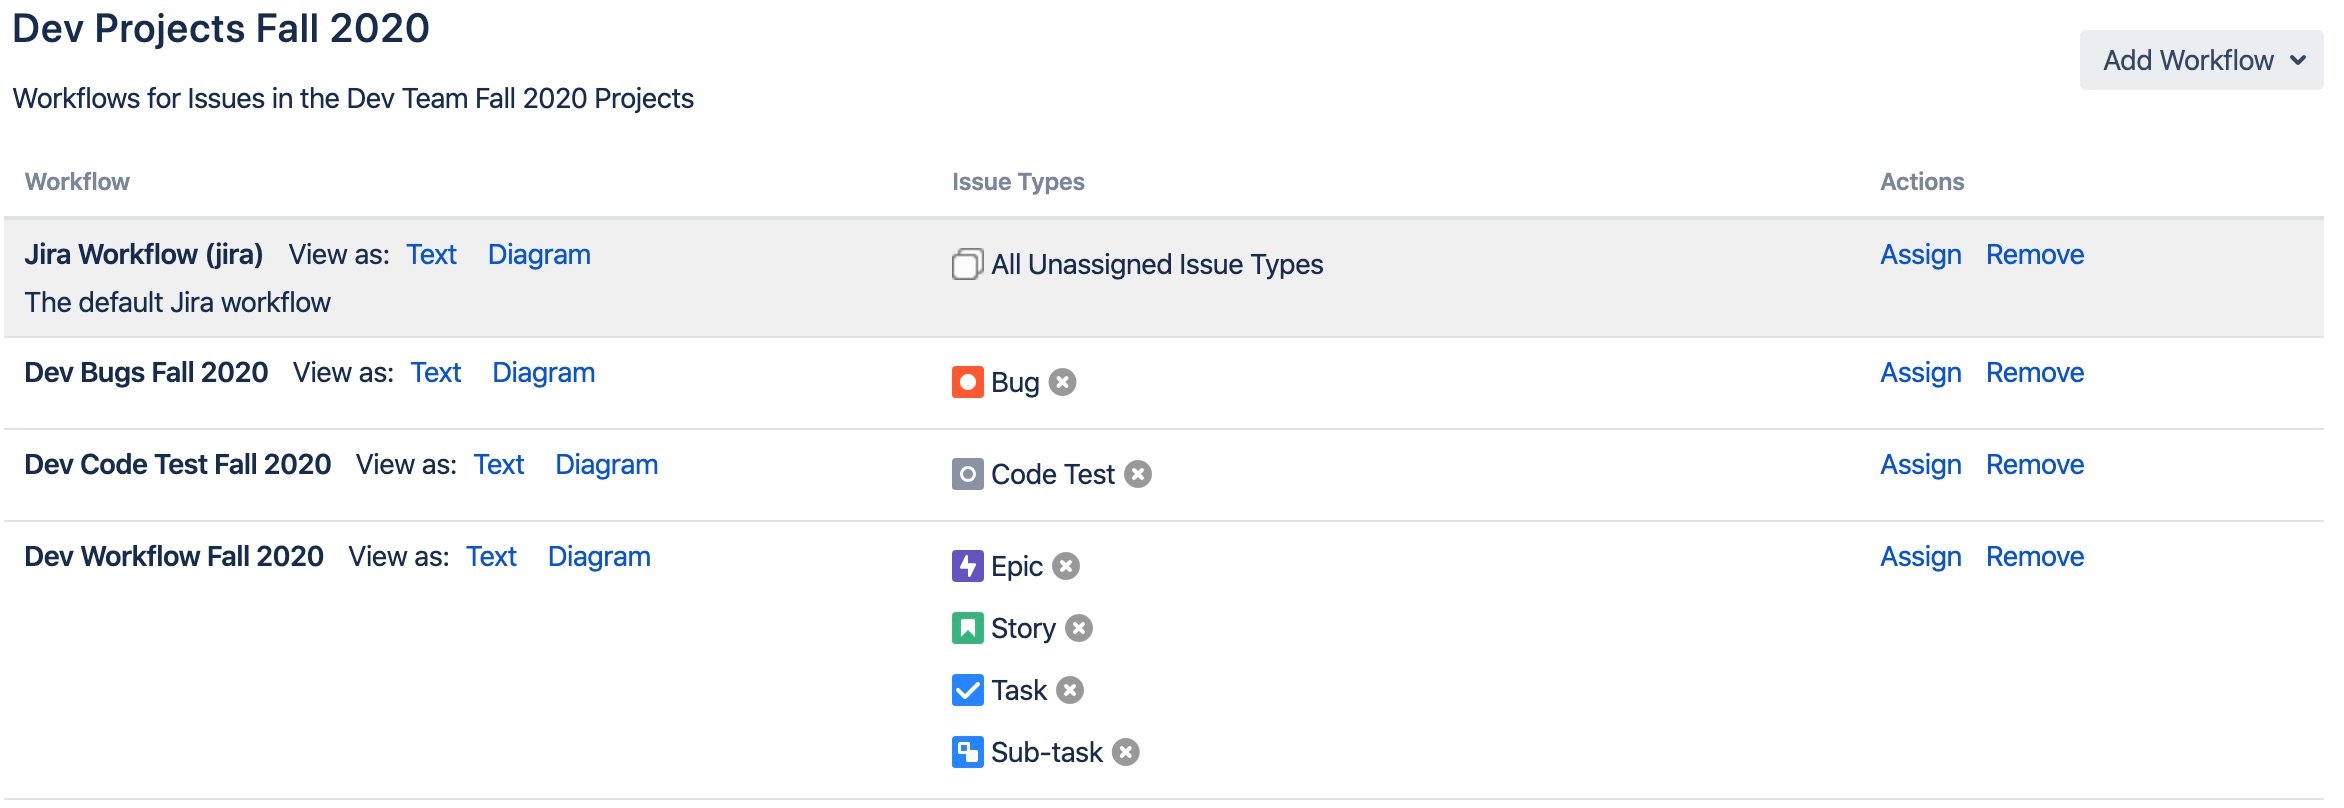
Connecting workflows to issue types and projects requires using workflow schemes. First, workflows are mapped to certain issue types as part of a workflow scheme. To do so, create a workflow scheme by navigating to the Issues menu of Jira Settings, selecting Workflow Schemes, and then choosing Add Workflow Scheme. Once there, you can select the workflows and issue types you would like to include in the scheme. Note that multiple issue types can be mapped to the same workflow.
Workflow schemes can then be associated with one or more projects. For example, a workflow scheme for software development might be associated with a project called “Dev Projects Fall 2020.” It could include workflows associated with issue types like “Bugs” and “Code Tests,” while all other issue types could be mapped to a general “Dev” workflow.
To define an association between a new workflow scheme and a project, click the Jira icon, navigate to Projects, select the project you want to associate the workflow with, and then choose Project settings. Click Workflows and Switch Scheme. From there, you can use the Associate button to associate the project you have selected with a workflow scheme. Keep in mind that while you can associate a workflow scheme with multiple projects, changes to the workflow scheme will then affect all of them, which may be undesirable in some situations.
When using Jira Service Management rather than Jira Software or Jira Core, request types must be mapped to issue types in addition to the steps described above.
Active vs. Inactive Workflows
Jira categorizes workflows in one of two ways: active and inactive. Workflows are considered active if they are in use by at least one of your Jira projects, while an inactive workflow must be associated with a project before it can be used.
Part of the purpose of distinguishing active from inactive workflows is to make it easier to create backups of a workflow. If you create a new workflow and want to begin using it immediately for a project, you can create a copy of it and keep the copy in inactive mode. The inactive copy serves as a backup and can be used to restore or rebuild your active workflow in the event that something goes wrong with the active version, such as a change from the original settings that causes the workflow to stop functioning properly.
Another important distinction between active and inactive workflows is that your ability to edit active workflows is severely restricted. Only the workflow description can be edited; you cannot change the name or the statuses associated with steps. In addition, you can only add an outgoing transition to a step if the step already has outgoing transitions defined.
How to Get the Most Out of Workflows
Teams that use Jira can take advantage of workflows to help visualize, organize, and track the progress of complex processes. However, simply creating a workflow and associating it with a project is not enough. You need to ensure that you’re using workflows to define efficient processes that accurately reflect your organization’s activities. Here are some best practices to follow when using workflows in Jira.
Avoid Unnecessary Complexity
You can add as many components to a workflow as you want, and you can customize their definitions in any way you want. This flexibility is important for building workflows tailored to your needs, but it's important not to go overboard by creating workflows with more components than are necessary, or by setting obscure component definitions that are hard to interpret.
In general, strive to create workflows that are concise and contain only the essentials required for your project. Attempting to go above and beyond will lead to unnecessary complexity and make your workflow harder to manage and use.
Map Workflows to Your Business Processes
The components that you create and define within your workflow should reflect your actual business processes. Theoretical processes might sound good when planning a project, but if they aren't actually associated with any specific business unit or operation, implementing them without significant testing is likely to create more problems than it solves.
You should also make sure that there are specific groups within your team who can carry out each part of your workflow, and that they have the tools they need to execute that process in the way it is defined in the workflow. Otherwise, you again run the risk of creating workflows that look great in Jira but are difficult to translate into action.
Seek Input from Stakeholders
Before creating a workflow, assess the needs and perspectives of all stakeholders. Stakeholders include not just individuals or groups who will participate in the workflow as assignees, but also anyone impacted by the workflow's outcome. Understanding the needs of all relevant parties will help you avoid gaps in the process and better anticipate possible outcomes.
Create Clear Workflow Diagrams
Workflow diagrams are a crucial resource for visualizing workflows and getting an at-a-glance understanding of how they operate. For this reason, it's worth investing some time in making sure the diagram is as clear and readable as possible. Use color-coding appropriately to help your team identify different components, and make sure that the diagram clearly shows how components relate to each other.
Test Workflows
Instead of thinking of workflows as something that one person or team creates and everybody then uses, treat them as a resource that must be vetted by stakeholders before they are implemented. Test the workflow before it is rolled out to the general organization and continue to do so on an intermittent basis after it has been introduced. These tests help you identify shortcomings that should be addressed before the workflow is widely used and ways to improve the process down the line.

Customizing Transitions
Jira allows you to configure a transition’s behavior in several ways. These configurations help to control transitions more rigidly in order to avoid unintended outcomes, as well as to automate parts of the workflow that would otherwise require manual effort by your team.
To configure a transition, choose Workflows from the Issues menu in Jira Settings, select the workflow you want to customize, then click Edit. Then click the transition arrow, choose a transition, and select the specific aspect of the transition that you want to configure.
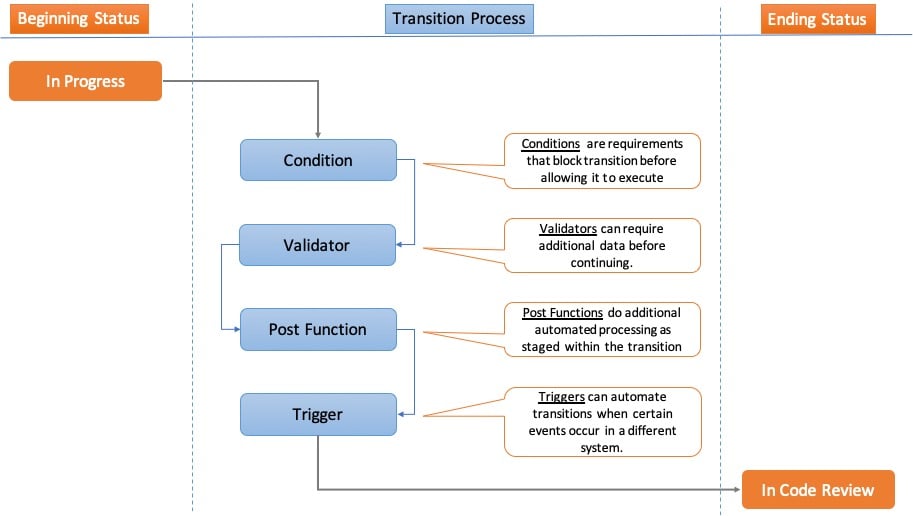
Conditions
Conditions specify prerequisites that must exist before a transition can be used. Failure to meet a condition will hide the transition from the user.
Conditions can control either who performs a transition or under what circumstances the transition is available. For example, a condition may require that the user is in the “Architect” role before they can use the transition “Start Design,” or that the transition “Complete Project” is unavailable for any issues that have outstanding subtasks.
Validators
Validators require users to enter additional data before a process can continue. They are a useful tool for ensuring that team members include all necessary information before a process moves forward.
Post Functions
Post functions allow you to define additional processes that must be performed during a transition. For instance, if a transition starts a process, you can use post functions to require additional steps to be performed at the same time, such as creating related tasks.
Triggers
Finally, you can customize transitions with triggers, which automate transitions when certain events occur. Triggers eliminate the need for your team to change the status of a process manually when a condition is met.
Using Workflow Properties
Jira also allows you to define properties at the level of an entire workflow, rather than defining transition-specific properties as explained above. Workflow properties can be used to restrict which actions can be performed for certain steps or transitions within a workflow. For example, you can prevent users from making changes to a field value once a certain condition, such as "Project Complete," has been met.
Atlassian’s Jira documentation includes details on which workflow properties can be defined.
Start Making Workflows Work for You
It's easy to create workflows in Jira, but it can be hard to optimize them to ensure that your business processes are as efficient as possible. You also need to integrate workflows with the rest of Jira in order to build the most effective project management solution for your team.
That's why it is wise to choose an experienced partner, like Contegix, to guide you in creating and managing your Jira workflows. Contegix is an Atlassian Platinum Solution Partner that specializes in managing Jira and similar tools, and we can help you with everything from performance slowdowns to integrating Jira and Confluence. Spend less time creating workflows and more time completing them: contact us today